실습 환경
CSP : Naver Cloud Platform
OS : Ubuntu 22.04
Terraform으로 NKS Cluster 생성
1. repo에서 코드 clone
git clone git@{git url}

## 디렉토리 tree
├── bastion.tf
├── data.tf
├── nks.tf
├── output.tf
├── security.tf
├── terraform.tfvars
├── user_data.sh
├── variables.tf
├── version.tf
└── vpc.tf
2. terraform.tfvars 를 이용해 클러스터 배포
cat terraform.tfvars

vpc_name = "my-vpc"
vpc_cidr = "10.10.0.0/16"
subnet = [ "10.10.1.0/24", "10.10.10.0/24", "10.10.30.0/24" , "10.10.35.0/24", "10.10.50.0/24" ]
subnet_type = [ "PUBLIC", "PRIVATE" ]
usage_type = [ "GEN", "LOADB", "NATGW"]
zone = "KR-2"
region = "KR"
site = "pub"
access_key = "{NCP IAM Access Key}"
secret_key = "{NCP IAM Secret Key}"
bastion_init_sh = "./user_data.sh"
#작업 디렉터리 초기화 명령어
terraform init
# Terraform 코드의 변경 사항 미리 확인
terraform plan
# Terraform 코드 실제 적용해 리소스 생성, 수정, 삭제 (승인 과정 없이 바로 적용)
terraform apply -auto-approve
3. Bastion host 접속
# Bastion host 패스워드 확인
terraform output -json root_password | jq '.root_password'

# Bastion host 접속
ssh $(terraform output -raw public_ip)

# sshpass를 이용해 명령어 한줄로 Bastion host 접속하기
apt install sshpass
sshpass -p $(terraform output -json root_password | jq -r '.root_password') ssh $(terraform output -raw public_ip)
K8S Cluster 기본 명령어
# Cluster 정보 확인
kubectl cluster-info

# Node 정보 확인 (상세 확인)
kubectl get node
kubectl describe node
kubectl get node -o yaml

# Pod 정보 확인 (상세 확인)
kubectl get pod -n kube-system
kubectl get pod -n kube-system -o yaml

# Name Space 정보 확인 (상세 확인)
kubectl get ns
kubectl get ns -o yaml
kubectl describe ns

# 전체 Object 정보 확인
kubectl get all -A

# kubens로 네임스페이스 뛰어 다니기
kubectl ns default
kubectl ns kube-system
kube-ops-view 사용해보기
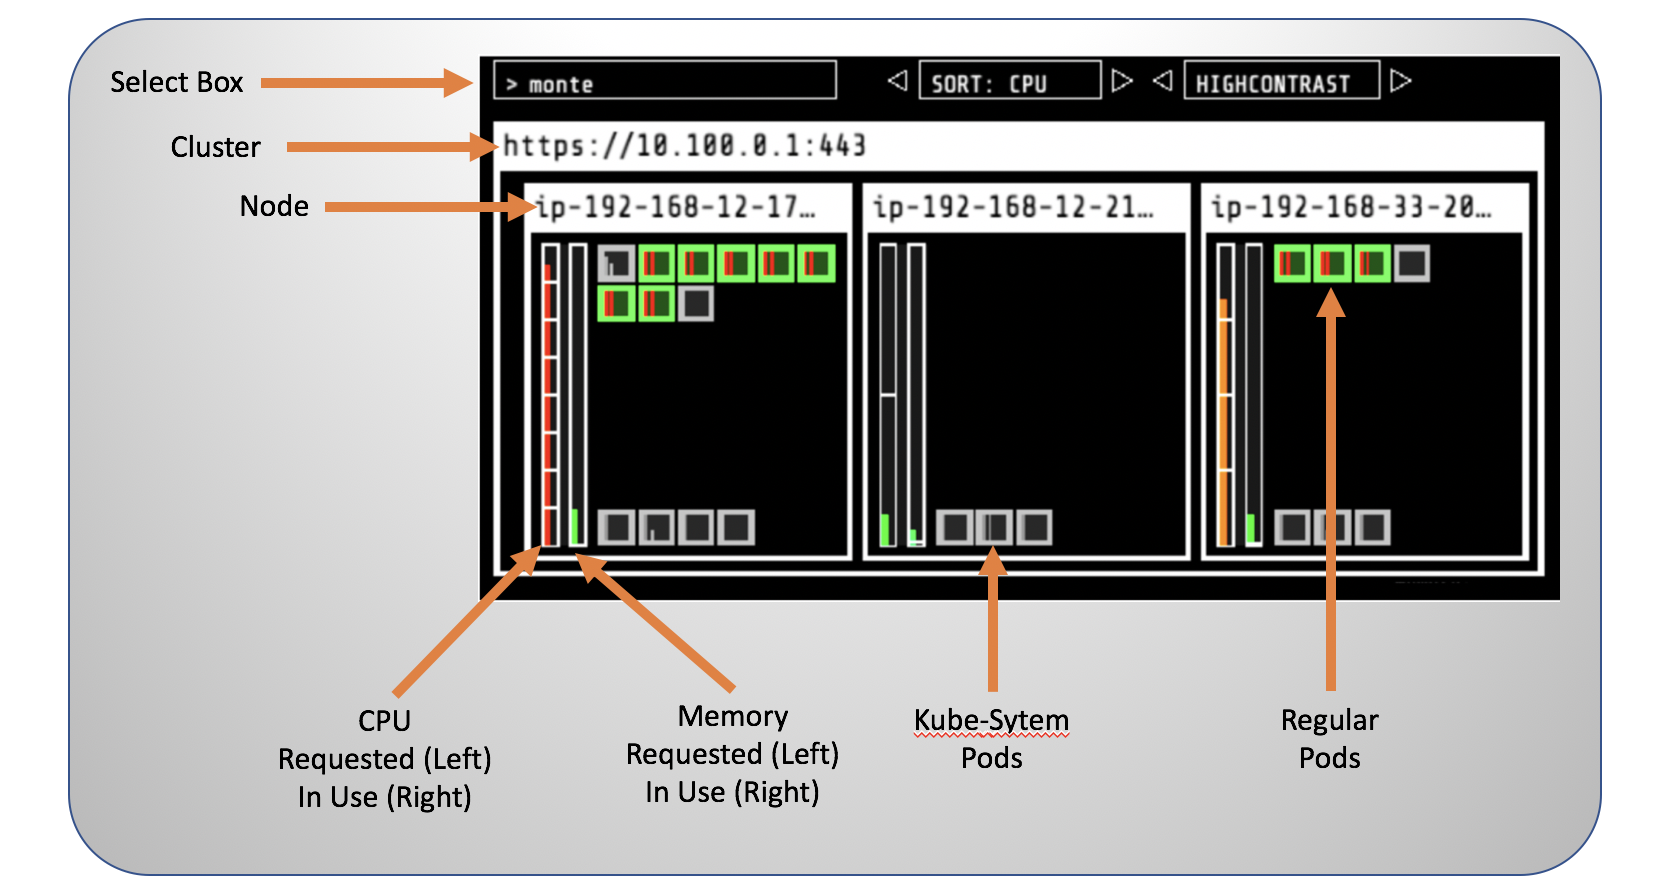
kube-ops-view는 k8s 클러스터의 상태, 리소스 사용률을 모니터링할 수 있는 대시보드
1. kube-ops-view 설치
# Helm 설치
curl <https://raw.githubusercontent.com/helm/helm/master/scripts/get-helm-3> | bash
helm version --short

# Helm repo 추가
helm repo add geek-cookbook <https://geek-cookbook.github.io/charts/>

# kube-ops-view 설치
helm install kube-ops-view geek-cookbook/kube-ops-view --version 1.2.2 --set env.TZ="Asia/Seoul" --namespace kube-system
2. kube-ops-view 접속 설정
## kube-ops-view 접속
# 외부 통신을 위한 socat 패키지 설치
apt install socat

# kube-ops-view pod.ㅌ 변수 지정
export POD_NAME=$(kubectl get pods --namespace kube-system -l "app.kubernetes.io/name=kube-ops-view,app.kubernetes.io/instance=kube-ops-view" -o jsonpath="{.items[0].metadata.name}")

# Pod port-foward
kubectl port-foward $POD_NAME 8080:8080 &

# Socat Redirect 설정
socat TCP-LISTEN:8081,fork TCP:127.0.0.1:8080
3. kube-ops-view 웹 페이지 접속 (bastion URL:8081)
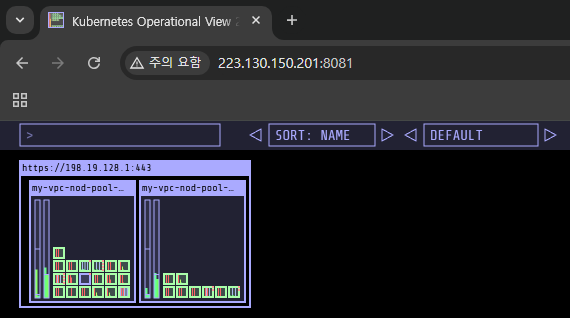
- kube-system에 kube-ops-view를 배포해야하는 이유
- kube-system 네임스페이스에 배포해야 핵심 컴포넌트와 다른 네임스페이스의 리소스도 읽기 권한에 문제가 없음
- kubectl port-forward를 했음에도 socat 설정을 하는 이유
- kubectl port-foward는 로컬에서의 port-foward의 역할만 하기 때문에 socat 설정을 통해 외부에서 접속 가능하도록 설정해야함
k9s 사용해보기
- CLI 환경에서 실행
- k9s는 cli 환경에서 실행되는 클러스터 모니터링 프로그램으로, 각 object를 빠르게 모니터링하고, 접근할 수 있습니다.
- kube-ops-view는 단순히 시각화만 제공하지만, k9s는 프로그램 내에서 object의 직접적인 수정과 조회가 가능합니다.
- 실시간 모니터링
- Pods, Deployments, Services등 주요 Kubernetes 리소스를 실시간으로 모니터링할 수 있습니다.
- 리소스 상태가 변경되면 바로 반영됩니다.
- 빠른 작업 수행
- CLI에서 리소스를 삭제, 편집, 다시 시작(restart) 등의 작업을 빠르게 수행할 수 있습니다.
- kubectl 명령어를 대체하거나 보완하여 사용하는 데 유리합니다.
- 리소스 간 이동
- 간단한 단축키를 사용해 다양한 Kubernetes 리소스 간에 쉽게 이동할 수 있습니다.
- 예를 들어, Pod의 로그를 실시간으로 확인하거나 특정 리소스에 연결된 설정(ConfigMaps, Secrets 등)을 탐색할 수 있습니다.
- 로그 뷰어
- Pod의 로그를 실시간으로 스트리밍하며, 검색이나 필터링 기능도 제공합니다.
- 컨텍스트 전환
- 여러 Kubernetes 클러스터를 사용하는 경우, 간단한 키 조작으로 클러스터 컨텍스트를 전환할 수 있습니다.
1. k9s 설치 및 실행
# Ubuntu
curl -sS <https://webinstall.dev/k9s> | bash
source ~/.config/envman/PATH.env

# MAC
brew install k9s

# Windows
choco install k9s

## k9s 실행
k9s
2. TEST Pod 실행
# TEST Pod yaml 생성
cat test-pod.yaml
====================
apiVersion: apps/v1
kind: Deployment
metadata:
  name: test-nginx
  labels:
    app: nginx
spec:
  replicas: 3
  selector:
    matchLabels:
      app: nginx
  template:
    metadata:
      labels:
        app: nginx
    spec:
      containers:
      - name: nginx
        image: nginx:1.14.2
        ports:
        - containerPort: 80
====================

# TEST Pod 실행
k apply -f test-pod.yaml
2048 Game 실행해보기
1. 2048 pod yaml 생성
# game-2048 Namespace 생성
kubectl create ns game-2048

# Namespace 선택
kubectl ns game-2048

# 2048 Game pod 배포
k apply -f app-2048.yaml

#cat app-2048.yaml
==========================
apiVersion: apps/v1
kind: Deployment
metadata:
  name: deployment-2048
spec:
  selector:
    matchLabels:
      app.kubernetes.io/name: app-2048
  replicas: 2
  template:
    metadata:
      labels:
        app.kubernetes.io/name: app-2048
    spec:
      containers:
      - image: alexwhen/docker-2048
        name: app-2048
        ports:
        - containerPort: 80
==========================
2. LoadBalancer 통해 외부에서 접속하기
# LoadBalancer 배포
k apply -f 2048-lb.yaml

# cat 2048-lb.yaml
==========================
apiVersion: v1
kind: Service
metadata:
  name: lb-2048-service
  namespace: game-2048
spec:
  type: LoadBalancer
  selector:
    app.kubernetes.io/name: app-2048
  ports:
    - name: 2048-demo-port
      port: 80         # LB 외부 포트
      targetPort: 80 # Pod 내부 애플리케이션 포트
==========================
3. Load Balancer 생성 확인

4. 2048 접속
